
There comes a time when "ordinary" presentation of photography becomes a tad less challenging. So I am now looking at ways to present my work a little differently with some help from Photoshop. Recently I found an old copy of Better Photoshop Techniques issue 2, 2005 (published in Australia by Better Digital Magazine Pty Ltd) and found an interesting article on montage joining (better known as collages). As I have no idea how to paste screen shots, you might have to bear with me so I will keep the instructions on how to collage photographs as simply as possible.
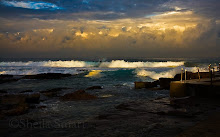
Bring an image into Photoshop (I use CS5)and using the Rectangular Marquee from the tool pallette, make a selection on the background, holding down the Shift key. For some reason, the first selection is square but after that, the selection can be rectangle of any dimension. Keep holding down the Shift key until you have selected several rectangular sections. The first selections are going to be the "top" level of the photographic collage. All other selections after that are going to be placed under the top layer selection. After you have completed the selections, copy the selections (Edit>Copy) and paste it as a new layer (Edit>Paste). When you paste anything into Photoshop, it automatically appears as a new layer. Then add a Drop Shadow layer style by choosing Layer>Layer Style>Drop Shadow. Don't be alarmed when your selections disappear - you will see the selected areas when you adjust the distance and size settings in the Layer Style. Its up to you how you want the drop shadow or collage to look. An important tip is that each time you produce another layer for selection that you do this from the original background layer. I found myself tearing my hair out when layers would not work as I had wanted to but found that I had missed the important step of producing the further selections by selecting the background layer. So select the background layer and continue to make the selections for the various layers. Make sure that the new selections overlap the originals. To place the collage against a white background (or any other colour for that matter!), create a selection that surrounds all of the parts by holding down the Control and Shift keys while you click on all of the thumbnails in the layers palette. Once all are selected, pick Select>Inverse, choose the Background layer and hit the Delete key. For the image above, I used the eye dropper tool and selected the sand in the pic to be the background colour.


No comments:
Post a Comment